About Digital Wallets
Learn about how digital wallets and tokenized cards work, and how they might be a fit for your card program.
Introduction
What is a digital wallet?
Digital wallets are applications such as Apple Pay and Google Pay that allow your cardholders to securely store their payment information, make payments, and store their payment history.
They can eliminate the need to carry around physical cards by letting your cardholders access their card’s payment information from a smartphone, smartwatch, computer, or tablet. As long as a device supports near field communication (NFC) transmissions, it can be used to make payments.
Because most consumers use wallets on mobile devices, the terms “digital wallet” and “mobile wallet” are often used interchangeably.
How do digital wallets work?
Digital wallets use a special type of card called a tokenized card. From your cardholder's perspective, they function similarly to a virtual or physical card. On the backend, a process called tokenization is used to replace a card's sensitive data (PAN, CVV2, and expiration date) with a token.
When a digital wallet uses a card for payment, it never exposes any of the original card details. Instead, the wallet provides a token. The token can be specific to a particular merchant or wallet, or valid for only a specific number of purchases.
When a payment is made, the merchant sends the token to the card network to match the token with the PAN. The network then forwards the authorization request to Lithic (and you, if you have ASA enabled) to approve or decline the request.
How can cards be added to digital wallets?
There are three primary ways that cards can be added to digital wallets:
- Manual Entry: Cardholder either types their card information directly into the digital wallet or uses an embedded image capture feature to scan the front (and sometimes back) of their card
- In-App Push Provisioning: Cardholder taps an "add card to digital wallet" button or similar action from your app. Push provisioning makes it easier for cardholders to add your cards to their digital wallets, which means they're more likely to use it when it comes time to pay for a purchase. Implementing push provisioning requires extra steps, as you'll need to integrate your app directly with the wallet provider. See the In- App Push Provisioning page for more information
- Web Push Provisioning: Cardholder taps an "add card to digital wallet" button from your website. Push provisioning makes it easier for cardholders to add your cards to their digital wallets, which means they're more likely to use it when it comes time to pay for a purchase. Implementing push provisioning requires extra steps, as you'll need to integrate to the wallet provider's flows. See the Web Push Provisioning page for more information
Implementation Steps
Across digital wallet providers and card networks, there are a few standard steps required to enable your program for digital wallets.
The below steps assume that Lithic is your program manager. Processor Gateway customers will go through many of the same steps with their program manager's assistance.
Establish a BIN or BIN range
You will first need to work with a bank to establish a BIN or BIN range for your card program, which Lithic can do for you. At this stage, Lithic will work with you to have a project opened with the card network to initiate the process of enabling your cards to be added to digital wallets.
Card art approval
Once you have a BIN in place, you will need to design how your card appears in the digital wallet.
Card art must fit within certain specifications and requires approval from the card network, digital wallet provider, and your bank. Here are the specifications that you will need to submit to your Lithic Implementations Manager:
- Company logo (1372 x 283) pixels as a PNG file
- Card design with no rounded corners (1536 x 969) pixels. PNG file needs to be less than 3MB in size.
- Company app icon (100 x 100) pixels as a PNG file
- Color code for your card’s background color (Hex code for Mastercard; RGB code for Visa)
- Color code value for your PAN color (Hex code for Mastercard; RGB code for Visa)
- Color code value for your card description color (Hex code for Mastercard; RGB code for Visa)
Lithic also enables customers to associate multiple card arts with each BIN. See Flexible Card Art below.
Card configuration
Next, you will need to provide some additional information that will be included alongside your card when your cardholder adds it to a digital wallet app, including:
- Terms and conditions
- Contact information
- Different types of identifiers (which the wallets use to link the card back to your app, where applicable)
Network configuration
After you determine how your card will be configured, the network will take steps to implement your configuration. Your Implementation Manager will submit a request to the network on your behalf to set up your card configuration.
Testing
Once your card and network configuration are complete, you will need to allow-list test cards on your BIN range to ensure that tokens are properly issued when you attempt to add them to digital wallets. This allows you to confirm that cards on your program are working as expected once they're issued to end users.
Submit approvals to network
Next, Lithic will submit forms that document successful testing and certain program details to the card network. While the issuing bank is not explicitly involved in submitting these forms, card networks typically refer to these forms as "financial institution forms".
Apply for approvals from wallet providers
Finally, the card network will take the forms provided in the prior step and submit them to the wallet providers for approval. Each provider may request slightly different information. Once your card receives approval from a digital wallet, you are ready to go live. Your cards can now be successfully tokenized and added to the approved wallet.
How Does Tokenization Actually Work?
Digital wallet tokenization involves three parties: the digital wallet (i.e., Apple/Google), the card network, and Lithic.
-
First, an end user initiates a digital wallet tokenization either manually (from the wallet app itself) or via push provisioning.
-
The wallet then notifies the network (MC or Visa) of the tokenization request, passing along their own recommendation (Decline, Require Additional Authentication, or Approve).
-
The network then passes this request to Lithic, who also has the opportunity to make a decision as an issuer. This request comes to Lithic with metadata from both the wallet (Apple/Google) and the network. Lithic offers two ways to decision on digital wallet tokenizations:
- On your behalf, generally on the basis of the wallets’ recommendations.
- Self-serve decisioning with a tokenization decisioning responder, similar to what we allow for normal card transactions with Auth Stream Access. See Tokenization Decisioning.
For Fraud Command clients, Tokenization Rules can be layered on top of either model to add attribute-based controls maintained on Lithic’s infrastructure.
-
Lithic then passes our issuer decision back to the networks, who pass it back to the digital wallet to:
- Green Path (approve tokenization)
- Yellow Path (require additional authentication of the end user)
- Red Path (decline tokenization)
Digital Wallet Cardholder Authentication
During the card tokenization process, the digital wallet and card network may recommend one of three outcomes: approve, require additional authentication, or decline.
If their recommendation is "approve", the tokenization will be approved and the card will be successfully added to the digital wallet. If the recommended outcome is "decline", Lithic will decline the tokenization request. Note: Tokenization Decisioning enables customers to layer their decisions on top of Lithic's and the wallet's recommendation.
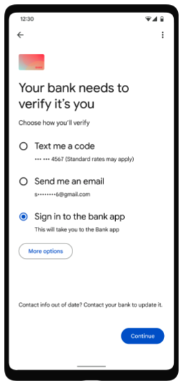
If the recommended outcome is "require additional authentication", the cardholder will be prompted (in the digital wallet provider app) to select one of three authentication methods:
- Authenticate via one-time passcode sent via text message or email.
- Authenticate in your mobile application.
Sharing End User Contact Info with Lithic for Digital Wallet Authentication
If the user selects the text or email options, a one-time passcode (OTP) is sent to the user's phone number or email address. Lithic must have this contact info to pass to the wallet to display a preview (e.g., j*****[email protected]) to the end user to select their authentication method. There are two ways to share this contact info with Lithic:
- Enrolling accountholders with Lithic. In this case, Lithic will store end users’ accountholder info to be able to deliver an authentication code to their email or phone. To ensure the best possible cardholder experience, Lithic recommends customers use the update account holder information endpoint to ensure that Lithic has the right information on file so OTPs are successfully sent to account holders.
- Using Tokenization Decisioning to pass the end users’ contact info to Lithic (e.g., email/phone) as part of the Tokenization Decisioning Response.
Digital Wallet Authentication via Text or Email
If the user selects the text or email option, a one-time passcode (OTP) is sent to the user's phone number or email address. Either Lithic or you can send the end user this OTP:
- Enterprise customers that choose to have Lithic send the code can customize an email address on their domain from which the OTP will be sent to cardholders. Work with your customer success manager to set up delivery of OTP via Lithic.
- You can also elect to receive a Tokenization Auth Code webhook to send the OTP yourself. Once the cardholder receives their OTP, they'll input it into the digital wallet app to continue the tokenization process.
Digital Wallet Authentication via Mobile Application
For Mastercard programs, you can also enable users to authenticate in your mobile application. When users select this option, the wallet forwards them to your mobile application to complete authentication. To enable mobile app authentication:
- Set up Customer Tokenization Decisioningand pass your mobile application name in your Tokenization Decisioning Response to be displayed to the end user in the digital wallet.
- Configure your program in Mastercard Connect with your application identifiers so end users are forwarded to your app from the wallet for authentication.
- Enable your mobile app to call Lithic's /provision endpoint for a payload to pass to the digital wallet for authentication. See Google's App to App verification guide for an overview and reach out to your implementation or customer success manager for Apple's corresponding guide.
Flexible Card Art
You can associate more than one card art with your BIN. You can then choose which digital wallet card art is displayed when an end user tokenizes their card prior to tokenization. To specify card art for tokenized cards:
- You will need card art approval for each additional card art. Share the new card art you want to associate with your BIN with your implementation or customer success manager. They’ll submit the art to Mastercard and the appropriate sponsor bank for approval. Processor-only customers should submit to Mastercard directly for approval.
- After the card art is approved, your implementations/customer success manager will share a corresponding Card Art Token UUID.
- Append this Card Art Token UUID to the Create Card endpoint or the Update Card endpoint requests via the
digital_card_art_tokenparameter. When the cardholder tokenizes, the digital wallet card art associated with that Card Art Token will be shown in the cardholder's digital wallet.
If the card artwork needs to be updated after tokenization you can call ourUpdate Digital Card Art of a Card Tokenization endpoint. This updates the art for one specific tokenization, not all tokenizations for a card.
Updated 4 months ago