Web Push Provisioning
Allow users to push provision their card from a website to the mobile wallet.
Web Push Provisioning allows you to show an "Add to Apple Wallet" and "Add to Google Wallet" button on your website that will allow users to add their card directly to Apple Pay on selected devices.

Implementation Steps
- Your BIN must be enabled for Digital Wallet Provisioning in order to use Web Push Provisioning. See the standard Digital Wallet Implementation guide for additional details. Web Push Provisioning can be completed during the initial digital wallet implementation or added later.
- Setup processes for each wallet provider will be provided during the project including artwork setup and registration.
- Integrate to Lithic's Web Push Provisioning endpoint following the development steps below.
- You'll be required to follow network and digital wallet guidelines for user authentication, displaying the card, etc. Your Implementations Manager or Customer Success Manager will provide documentation for Apple and Google requirements.
- After integration is finished Lithic will work with you to complete the required wallet provider launch test cases.
- Lithic will work with the wallet provider to review the testing and schedule a Go-Live date.
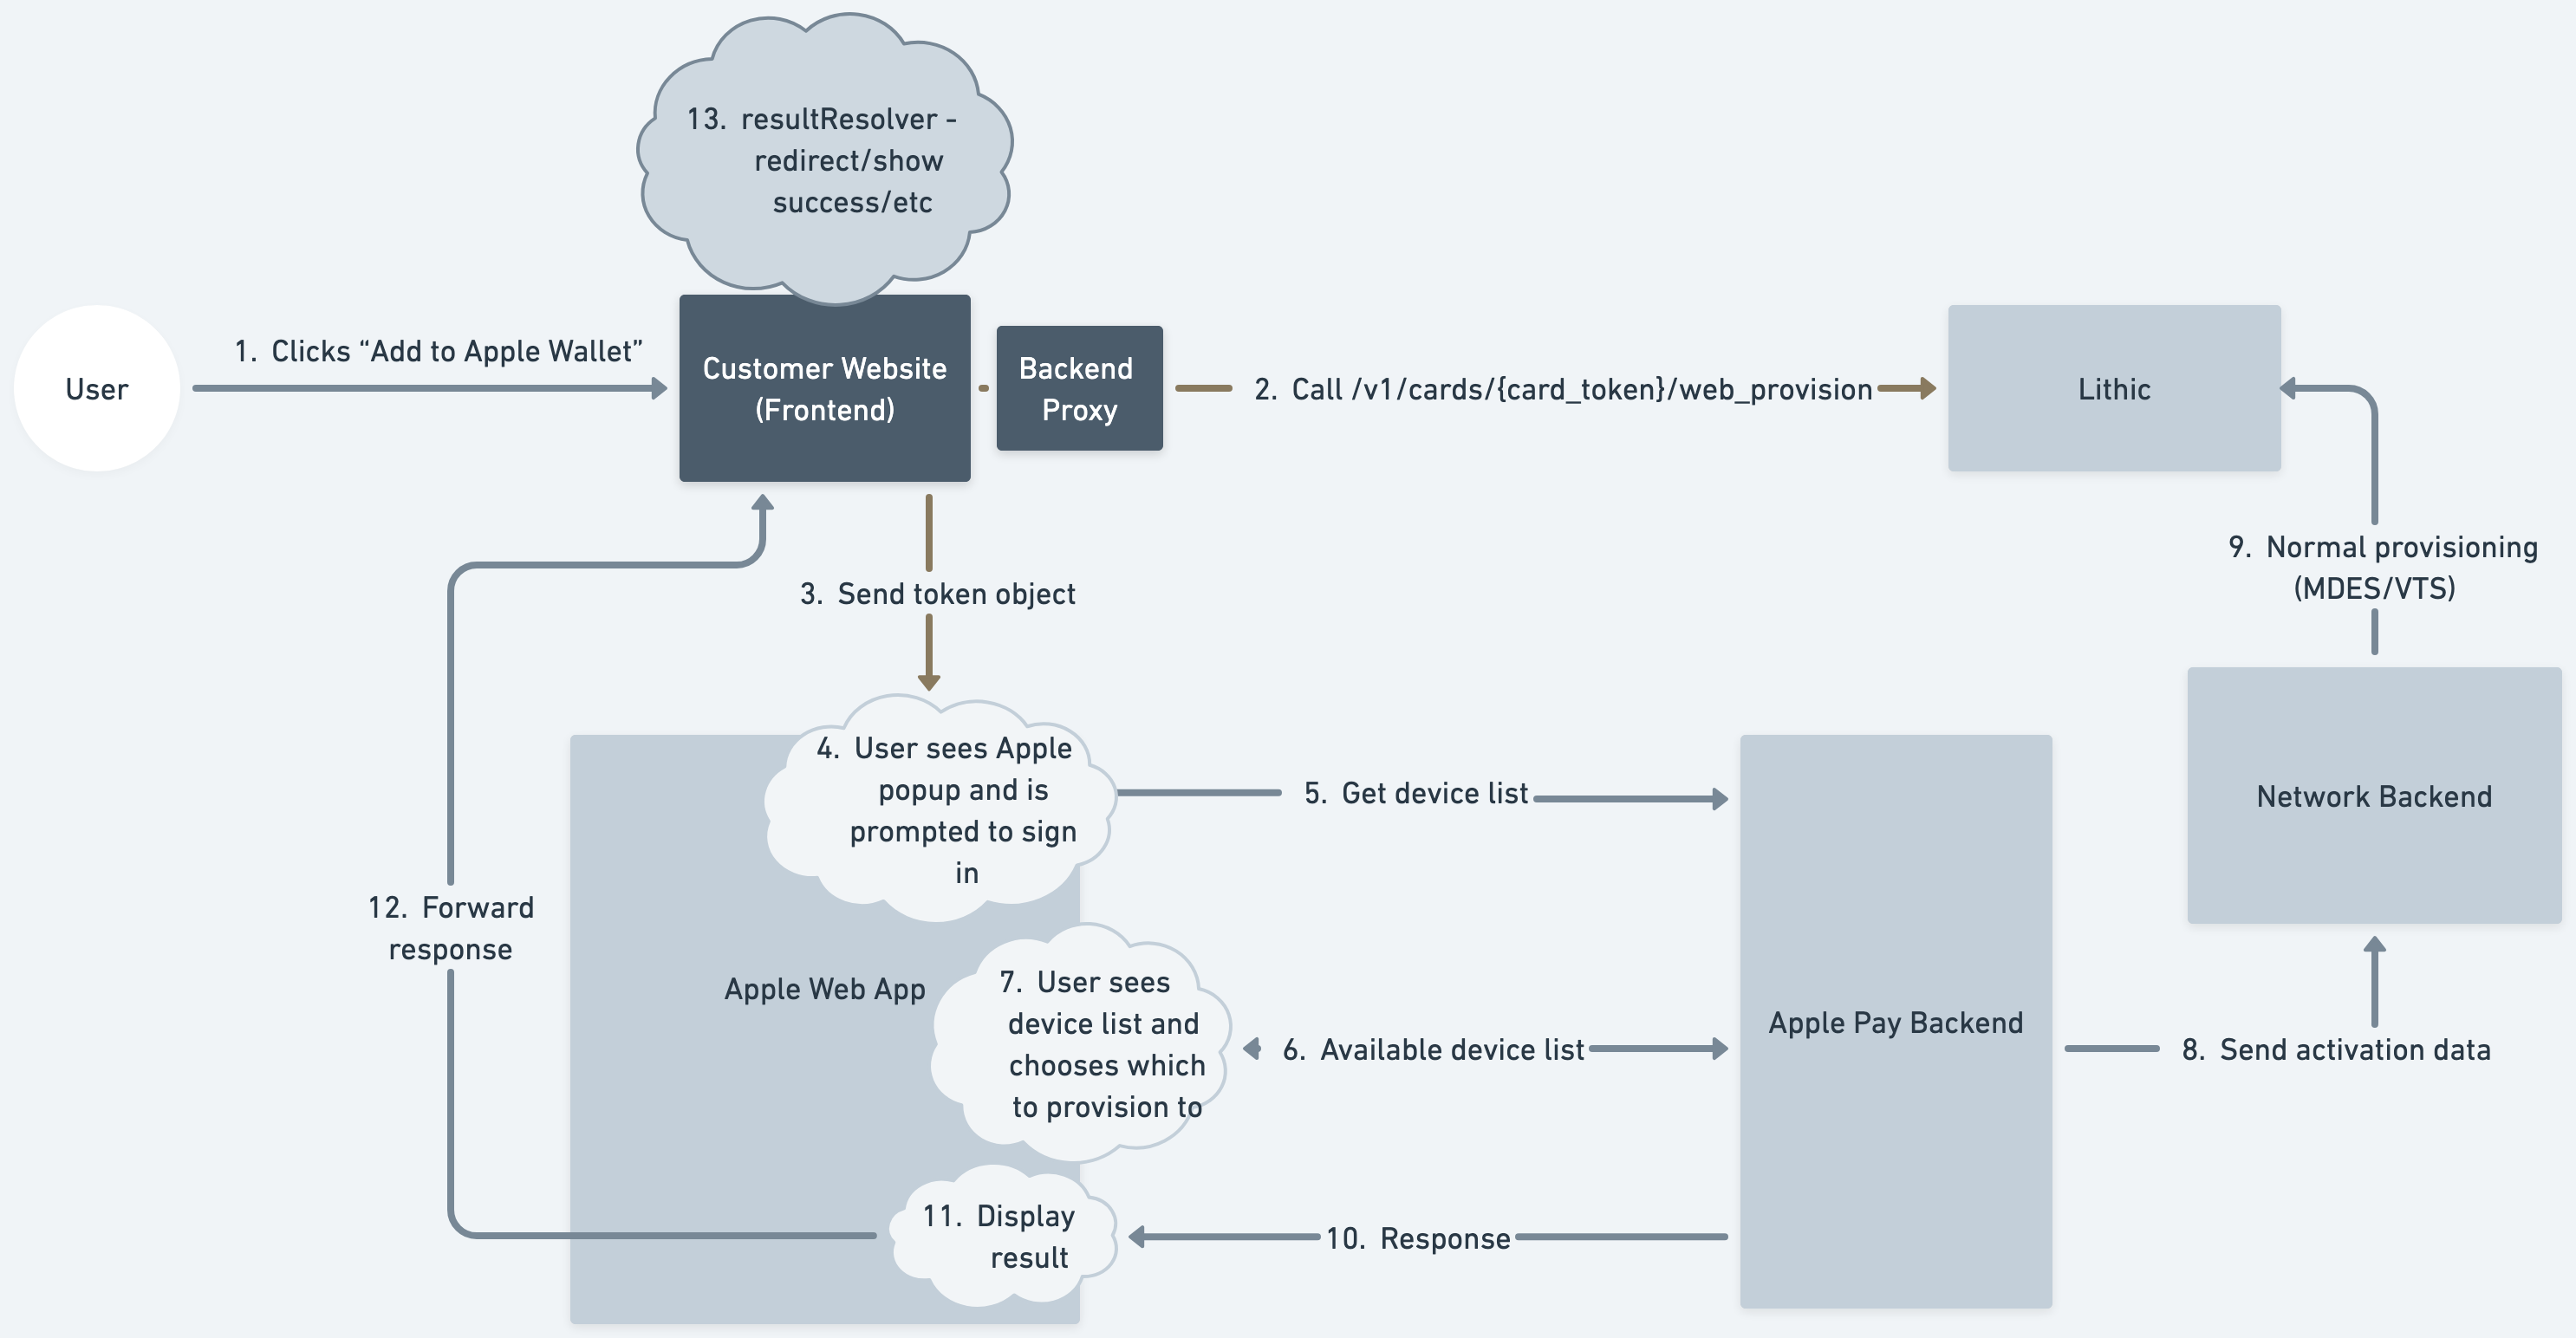
Provisioning Flows
Step 1: After the user has gone through proper authentication to login, they can click "Add to Apple/Google Wallet" to start the provisioning flow.
Step 2: You will then call Lithic’s Web Push Provisioning endpoint to initiate the request.
Steps 3-7: The user will see a pop-up window from Apple/Google and will need to follow the prompts to authenticate their account, select the device they want to provision their card to, and agree to the Terms and Conditions.
Steps 8-9: The request for tokenization will be completed between Lithic, Apple/Google, and the Network.
Steps 10-13: The response will be shown to the user.
Apple Pay Provisioning Flow
Google Pay Provisioning Flow

Development Integration
To complete your integration you'll need additional documentation from your Implementation Manager or Customer Success Manager.
Both Apple Pay and Google Pay use Lithic’s Web Push Provisioning endpoint. The difference in the integration for each wallet provider are noted below.
Callouts
- To avoid exposing API keys, we suggest having your front-end site call a backend proxy. The backend proxy should be responsible for actually executing a call to Lithic's web provisioning API endpoint.
- If users have pop-ups disabled on their web browser, the wallet provider script may fail to load.
Apple Pay Integration
Add to Apple Wallet Button
The Add to Apple Wallet button you place on your front-end site must follow Apple’s guidelines here. You can also download the Add to Wallet badge files from their site.
Code Snippet to Invoke Add to Apple Wallet Button Script
Below is a code snippet for how to invoke Apple’s popup script via the Add to Apple Wallet button. In this example, the HTML ID of the button is expected to be add-to-apple-wallet and you will use Lithic's partnerID.
<script src="https://smp-device-content.apple.com/navweb/asset/initAddToAppleWallet.js"></script>
<script>
  initAddToAppleWallet({
    partnerId: "ORG-97a7c2b2-11ec-4d6d-a3f7-c3d06f4b2703",
    domain: "https://apple-pay.apple.com",
    buttonId: "add-to-apple-wallet",
    jwsResolver: jwsResolverCallback,
    resultResolver: resultResolverCallback,
  });
</script>
Here, the jwsResolverCallback should be a function that invokes Lithic’s Web Push Provisioning/cards/{card_token}/web_provision endpoint.
Apple Code Snippet for resultResolverCallback
Below is an example for a resultResolverCallback function:
function resultResolverCallback(result) {
  if (result.status === "500") {
    // Action for error
  } else if (result.status === "408") {
    // Action for timeout
  } else if (
    ["200", "202", "206"].includes(result.status) &&
    addToAppleWalletButton
  ) {
    // In the case of success, hide the Add to Apple Wallet button
    addToAppleWalletButton.style.display = "none";
  }
}
Note that upon successful provisioning, the Add to Apple Wallet button must be hidden per Apple's requirements
Google Pay Integration
Code Snippet to Invoke Add to Google Wallet Button Script
Below is a code snippet for how to invoke Google's popup script via the Add to Google Pay button. In this example, the HTML ID of the button is expected to be add-to-google-wallet.
<script src="https://developers.google.com/static/pay/issuers/apis/push-provisioning/web/downloads/integration.min.js"></script>
<script>
  const addToGoogleWalletButton = document.getElementById(
    "add-to-google-wallet",
  );

  addToGoogleWalletButton.addEventListener("click", () => {
    googlepay.openAppWindow({
      integratorId: "YOUR_INTEGRATOR_ID",
      tokenSetting: 1,
      cardSetting: 1,
      cardExtraOptions: {
        virtualCardsSetting: 0,
      },
      isTestEnvironment: false, // Set to true for non-production environments
      clientSessionId: "YOUR_SESSION_ID",
      hl: "en-US",
      onReady: () => {},
      onSessionCreated: onSessionCreatedCallback,
      onSuccess: onSuccessCallback,
      onFailure: onFailureCallback,
      onCancel: () => {},
    });
  });
</script>
Here, the onSessionCreatedCallback should be a function that calls your secure backend server, which in turn invokes Lithic’s Web Push Provisioning/cards/{card_token}/web_provision endpoint.
const onSessionCreatedCallback = async (payload) => {
  // Call your backend server (NOT Lithic directly)
  const response = await fetch("/your-backend/provision-google-wallet", {
    method: "POST",
    headers: {
      "Content-Type": "application/json",
    },
    body: JSON.stringify({
      cardToken: "CARD_TOKEN",
      serverSessionId: payload.serverSessionId,
      publicDeviceId: payload.publicDeviceId,
      publicWalletId: payload.publicWalletId,
    }),
  });

  const paymentCredentials = await response.json();

  // Push the credentials returned from your backend to Google Pay
  googlepay.pushPaymentCredentials(paymentCredentials);
};
Updated 4 months ago